Showing posts with label fibre art. Show all posts

Monday, March 26, 2018

Eco print, Indigo and Rust

What a combination of natural processes have gone into this new art quilt.  The cotton fabric was eco printed with leaves from my garden ... then the long edges of the fabric were dipped into the indigo vat to give just a hint of pale blue ... then I rusted it on an old iron trellis found in my yard.

I wanted to have a take-long piece to work on when travelling.  I find that hand stitching passes the time when flying (and eases my anxiety as well!) so I chose a piece that will have LOTS of handwork on it.  I sandwiched this piece of fabric with cotton batting and backing and then machine free-motion quilted around the rusty elements and down the indigo-dipped edges before applying an invisible binding. The result is pretty wonderful already, but I have lots of hand stitching to do on this piece as well as some applique, so check back to see how it progresses . . . and to see a full view.
The finished size is approximately 14" x 52"

Sunday, October 25, 2015

Eco print purses are ready!

Wow, it is a whole month since I posted here and I have been busy creating purses and scarves from my eco printed fabric.

This weekend I bundled up some more fabric with fall leaves and they are now curing for the next four or five days ... it is SO hard to wait that long to unroll the bundles and see what prints have appeared.  This time I used one pot to which I added just a little cutch and some pomegranate tea (the fabric looks warm brown on the outside of the bundles) and a second pot to which I added some logwood and osage along with rusty iron spikes (they look bluer on the outside of the bundles). 
Here are the bundles after they were taken from the pots and they are draining and curing in this mesh basket. The two darker bundles are scarves that I have over-printed to get some more distinct prints in the middle of them ... they were quite dark already so I am interested to see how they turn out this time ... maybe I shouldn't have added more iron, but I'm being adventuresome!

I have been working on a new design for purses using this eco printed fabric. They are a little larger than my usual little fold-over purses and they also have a sturdy zipper along the top.  I listed the first one in my Etsy shop today and will list more during the coming week.
I am also working on some of my "usual" design purses (one of them was listed in my shop today) as I know that some people just love that design.

Please drop by my Etsy shop to see more photos kathykinsella.etsy.com

What do you think of them????


Wednesday, June 17, 2015

Prayer Flags for "Learning"

I was asked to make prayer flags that will be given as gifts to speakers, musicians, course leaders and others at Sorrento Centre this summer and now that they have been delivered, I would like you to have a peek at them.
They were created by using hand-dyed fabric (blue) that I tore into the appropriate size strips and then dipped the bottom edge in bleach to discharge the colour ... then I painted that edge with golden and greenish textile paints to create meadows and hills.  I then screen-printed a tree on each flag and followed that with hand embroidery of a few flowers before adding the hand-lettered "learning" patch. The top edge was turned over and hand stitched to hold a twig of red dogwood that I gathered at Sorrento Centre this spring.  These are single-sided flags and all the edges are left ragged so that if they are left outside in the weather they will fade and fray away, but they will maintain their colour if kept inside, out of direct sunlight.

They were a delight to make and I love that we chose the word learning for these flags,  from their motto, Sorrento Centre: A holy place of transformation for learning, healing and belonging.

Sunday, January 25, 2015

Wildflower Meadows in Felt and Stitch

Wildflowers are a favourite theme for me when I am needle felting. The felting seems to lend itself to gentle landscapes and adding hand stitched flowers and foliage seems to make them come alive.

This is the first time that I have stitched the felted landscape to a fabric background and then continued the stitching into that background.

The piece was then wrapped and stapled to a stretched canvas for hanging.


Sunday, November 16, 2014

Printing fabric

Last month I attended a three-day workshop at Sorrento Centre where Catherine Nicholls was teaching a course on working with thickened dyes.  It was a fantastic three days of playing with fabric and dyes under Catherine's excellent guidance.

We worked on designs first and then translated those designs into screen printing and block making techniques. I will post more about the block printing another day.

This is my silk screen that is prepared for breakdown screen printing ...

And this is the metre of fabric that I printed from that screen ...

It is a gorgeous piece of fabric and I am giving lots of thought as to how I will use it.

Tuesday, July 1, 2014

Dyeing with Indigo

I am taking a workshop this week at Sorrento Centre that focuses on dyeing fabric with natural indigo dye. It is such fun to be a participant in the class and to have fun of playing with fabric for hours each day.

This workshop is led by Thomas Roach who is a talented textile artist from Vancouver and he is preparing vats of dye for us and teaching us all about indigo as well as shibori stitching techniques. I have never worked with indigo before and I love the way it turns from green to blue once it comes out of the vat and hits the air ... who knew!! For two days we have been creating samples on cotton and silk and tomorrow we will start work on a larger piece, a personal prayer cloth, using some of these techniques.

Here is a photo of Thomas and a couple of the participants dipping their samples into the vat . . .
I will try to remember to take some pictures of our samples and post them later ... they are gorgeous!


Wednesday, April 23, 2014

Blessings Prayer Flag

Blessings . . . this prayer flag has many blessings flapping from the lower edge of the flag. It has been created from some of my hand dyed and monoprinted fabrics and was destined to be an example for my upcoming prayer flag workshop but . . .
I  have a friend battling a brain tumour and I felt that this was the week he needed to have this prayer flag so it has already headed off to Vancouver.

This is a very free-spirited flag ... you can see that it is not "square" and there is an asymmetrical and casual balance to the flag, which is how I see life taking us sometimes. The soft purple fabric is a more densely woven cotton than the fabric with the blue and purple monoprint on it, which provides a soft contrast in texture. This is a single thickness of fabric so if it is left outside (or handled a lot) the edges of the fabric will fray and soften with time.

The narrow strips of purple cotton have been printed with many of the blessings I wish for my friend at this time. There is a knot at the end of each blessing and they are attached by a purple bead to the main part of the flag.

One of the techniques we will experiment with in my workshop at Sorrento Centre starting this weekend, is monoprinting ... I'm sure that the participants will feel like they are back in pre-school as we play with paints on gelatin plates and transfer the designs to fabric ... fun! There is still space if you want to join us so just call Sorrento Centre and come along!


Wednesday, January 8, 2014

Side two of the Prayer / Inspirational Flags


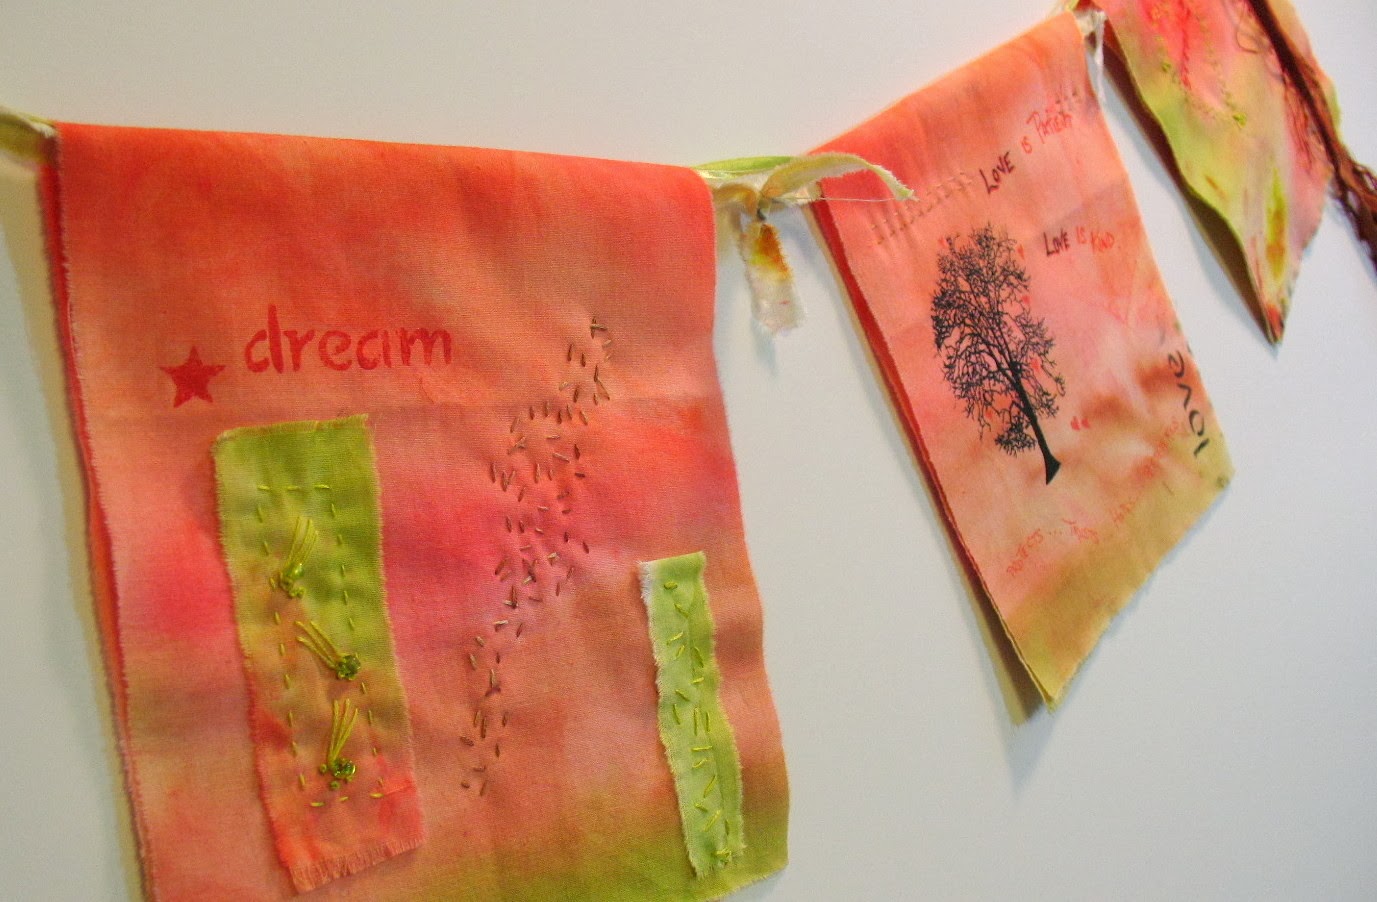
Because I created these flags with a back side to camouflage some of my stitching, I decided to also add more design elements to the reverse side ... think of them hanging on a clothes line in the garden or from the ceiling in your office, where they can be seen from both sides.

The first flag is "dream" and I have added two little patches of the fabric stitched with primitive hand stitches and a few little beads.  The drift of seed stitches comes through from the front of the flag where it was also a design element.

The centre flag is "love" and some of the words from 1Corinthians are written on this flag. I have also used the screen-printed tree with a few little hearts added as leaves on the tree.
The third flag is "smile" and I stencilled this word into the centre of the stitched heart (which is also part of the design on the other side of the flag). I added a few French knots, a little beaded patch and a ribbon of frayed silk fibre that hangs over the primitive stitching that comes through from the front.
This has been a delightful project to work on and it really has been inspirational, soothing, and thought-provoking as I worked through my choice of text and stitch.

Registration is now open for this workshop at Sorrento Centre (www.sorrento-centre.bc.ca) or phone (250) 675-2421 or toll free 1-866-694-2409.

Thursday, January 2, 2014

Prayer Flags ... Inspiration Flags

I have been having such fun creating a small set of prayer flags as a class sample for my upcoming workshop at Sorrento Centre!  I just know that it will be an enjoyable class for the participants as they work on a theme that suits them using techniques that I will teach during the workshop.

This is a set of three contemporary prayer flags that are double sided, but have no batting between the layers. Some of the stitching has gone through both layers, but each side is unique.  I will show you the second side of this set next week, but for now I'd like to share side one of the three flags. They are approximately seven inches square.

These flags have been created on a piece of my hand-painted fabric that has been awaiting inspiration for a couple of years.  I wish I had taken a photo of the piece of fabric before I tore it up, but you will notice the variations in colour throughout the flags, including little bits of white showing where I had not painted the entire piece of fabric. 

The hues of watermelon and chartreuse have been continued in the threads I chose for the stitching as I really wanted these to be peaceful and harmonious flags.

I chose "hope" for the first flag and the images of hearts.


The next flag will hang as the centre of the three and I chose "peace" for the theme and included a peace symbol that I created in pointillist style.

The tiny buttons (about 1/4" in size)  that cascade down the flag are symbols of something that holds us all together.


The third flag is "believe" and it is represented by a screen-printed tree that is anchored in the earthy part of the flag.

A sprinkling of seed stitches in a variegated thread drift across the flag and in the lower left corner there are three little patches with beads and hand embroidery.


Here is the link to the workshop where I will be teaching inspirational flags and buntings at Sorrento Centre

Wednesday, August 14, 2013

WIP - Fibre Art Journal Class Sample

I am working on a new class sample for a workshop I will be teaching this fall ... and condensing it from a four-day workshop into two days!  It has been a bit of a challenge to figure out what I will have time to teach in those two days and to give the participants a vision of how their finished journal will look.

The accordion style journal is such fun to make and I hope that these students will enjoy the process as much as the finished product.

So far, I have created all the fibre art samples that I am going to include and now I am working on the finishing touches ... finishing the outer edge and adding some more embellishments to the pages.

Here is one side of it so far ...

and this is the other side, photographed with some of the threads and beads that I am considering ...

I hope to finish this pretty darn quickly and will post some more photos of it later.

By the way, a WIP is a Work in Progress :)

Tuesday, June 18, 2013

Fluttering By

 My butterflies art quilt had its first showing at the Salmon Arm Quilt Show earlier this month and it received lots of oohs and aaahs when visitors took the time for a close look at it.  It measures approximately 20" x 34" and I blogged the process in March if you would like to scroll down to find that post. I am pleased with the way that it has turned out and I'm sure that I will enjoy continuing the butterfly theme into future work.

Here is a detail shot of one of the butterflies. I created the butterflies separately and then machine appliqued them to the quilt before adding hand stitches. The bodies of the butterflies are wet-felted wool. If you click on the photos you can zoom in for a closer look.

This art quilt has been entered in the Shuswap Lake Festival of the Arts show in July.
UPDATE: This piece was awarded "Jurors' Choice Award" at the SLFA July 2013.

Wednesday, January 30, 2013

Fluttering by with a Work in Progress

One of my art quilts has been "stalled" for a couple of years . . . I started out with wonderful ideas of doing a flight of stylized butterflies across a background of hand dyed fabric (the first piece I ever dyed, that I had been saving for years!) . . . but as I approached the critical time of adding those butterflies, I found that they had lost some of their allure.  I couldn't figure out the problem so I finally rolled up the quilt and it sat on a shelf for a year or more.

At some point last year I hauled it out again and pinned it to my design wall so that it would not be too far from my thoughts . . . but, still I did nothing with it.

Yesterday, however, I re-discovered one of my favourite books and the wonderful natural life created in fibre by Annemeike Mein, and I decided to play a little bit with a different style of butterfly.    I don't know exactly how she makes her butterflies but I made up my own version using her photos as inspiration.

Here are the wings I made, created as two units of upper and lower wings, free motion stitched in a variety of threads. They have been created on green silk organza with heavy duty Solvy used as a backing.


I still have to create the body of the butterfly, but I am pleased with this first attempt.


Wednesday, July 11, 2012

Rhapsody in Blue

 The silk fibres in this silk fusion were hand dyed using kool-aid . . . the blue and purple took beautifully and have resulted in a smooth harmony.  The silk fusion was stitched to a background of black dupioni silk and backed with black quilt batting.  I used free motion machine stitching, hand embroidery, and beading to accentuate portions of the silk fusion and then hand-couched some rich turquoise hand spun yarn to the surface.  The piece was then mounted on a stretched artist's canvas.

On the long dangling ends of the yarn I have added some fibre art beads that I created by hand painting tyvek from some old envelopes and then heat distressing it along with some synthetic organza and tulle in the same turquoise and purple colours.  Additional seed beads and larger beads have been added for more interest. The bead dangles are asymmetrical ... and hang several inches below the bottom of the canvas.

This piece has a picture hanging wire on the back so it hangs from a nail on your wall just like any painting. This piece measures 20" x 16".  It is currently entered in the Shuswap Lake Festival of the Arts and will later be available for sale in my Etsy shop.

PS - On opening night at the Shuswap Lake Festival of the Arts, I found that this piece had received a Juror's Choice Award.


Wednesday, June 27, 2012

Sorrento is 100 Years Old

I live near the village of Sorrento which is located about half way between Vancouver and Calgary on the Trans Canada Highway.  This year Sorrento is celebrating it's 100th Anniversary and there are lots of celebrations taking place throughout the year.

The Shuswap Lake Festival of the Arts is an art show and sale that takes place in the village every July.  This year I wanted to create something that would speak to the 100th anniversary, and I decided on an art quilt that would represent a bit of the landscape of the area and have some words that would celebrate 100 years.

I was originally going to do a topographical map of the area but started sketching a slightly aerial view looking down the lake and my hubby was so taken with the sketch that he convinced me I should try this image in fabric.  In this image, Sorrento is located in the foreground of the piece (I chose not to include any buildings or highways ... only the land and the lake which have remained the same for 100 years) and looking further east down the lake you can see Copper Island in the middle and the mouth of Blind Bay on the right side (since it really is a blind bay, you can't see that opening when you are just looking east at lake level ... but I wanted to have it more noticeable since that's where I live!).

The dates, 1912 - 2012 and the name, Sorrento BC, have been stencilled onto the asymmetrical borders using Shiva Paintstiks in two colours to give the letters a bit of character. The texture that has been quilted over the landscape portion has been achieved by writing a little story about Sorrento in free motion quilting.  It is my first attempt at writing free motion so I am sure that future art quilts will show some improvement but I am very pleased with the effect that it creates.  Both the stencilling and the quilted writing were something that was covered in a course I took this spring with Catherine Nicholls ... it was a great workshop and I came away with numerous things that I would like to experiment with.

The heart that is quilted into the top left corner of the quilt is there because Sorrento is known as
"The Heart of the Shuswap".


Friday, June 22, 2012

Tree of Life - the finale

It's been a long time since my last blog post so . . . . as I said at that time, this tree of life landscape was commissioned to be used as a book cover so there were some design factors that had to be considered for it to be functional as well as an inspiring piece of art.  After a consultation, we decided to eliminate the roots of the tree and bring in more of the spring garden aspect of the landscape.

I re-worked the lower section of the landscape with a cheery hand dyed green fabric and then added flowers in the garden with hand embroidery.  It is a representation of the memorial garden at Sorrento Centre.


The book cover was then cut down the spine and I inserted another piece of hand dyed fabric that I printed with the name of the centre.  There is a pocket in the front flap to hold pamphlets or papers and it has been tightly fit to the scrapbook sized binder.

Sunday, April 29, 2012

Work in Progress - Tree of Life Landscape

It's been ages since I have last posted new work ... but it's certainly not because I have been idle.  The winter has been full of fibre art experiments, workshops and dabblings . . . and now that spring is underway, I feel that I would like to post some photos of a piece that I am working on right now.

This is a small art quilt that will not see life as a wall hanging, but as a book cover ... I will post more on that, and final photos, once it has been presented to the organization that commissioned it.  In order to make this as durable as possible, I had to reject some of the techniques and fibres that I might have liked to use in this piece.  Because it will be handled (although not heavily) I felt that I should use woven fabric and stitching to achieve the look I wanted.  The fabric is all hand-dyed or hand-painted ... some of it by me, some by others.

The background design is a slightly abstract landscape of our beautiful Shuswap Lake and the tree has been created as a tree-of-life, with the roots going down into the ground and the branches and leaves reaching to heaven.  The tree has some limbs that have been cut off at some time, but the other branches are still carrying on and bringing life to the myriad leaves, represented by hand stitching in a variety of green threads.

There is still more work to be done on it, but I am pleased with how it is developing.

Tuesday, January 17, 2012

Swatch Stitch and Stash


This is the sample for a 4-day workshop that I will be teaching at Sorrento Centre in April. My class is entitled "Swatch, Stitch and Stash" because we will be using stitching up swatches of fabric from your stash to create a fibre art journal of the techniques that you learn during the workshop.

Some of the techniques will include creating your own unique fabric, fibre art beads, silk fusion, a variety of edge finishings, needle felting, accent embroidery stitches, free motion machine stitching, thread painting, original cords and covered sticks, thread lace and beading ... and then the samples will be compiled into a journal format that will be either accordion style(like the one pictured here) or an "infinite journal" using grommets and rings. Click on the photos to zoom in for the details.

This is a workshop that will engage intermediate level art quilters but will also be great for those who are just taking their first steps in this area ... you do, however, need to have a good knowledge of your sewing machine.

This workshop is a retreat format ... delicious meals and accommodation are included in the package price ... Call Sorrento Centre at 250-675-2421 to register.

Tuesday, January 3, 2012

Daisy a Day


This is a little art quilt that I created as a sample for a class I will be teaching at Pleasant Valley Quilt Shop in Armstrong, BC in April. The main focus of the class will be creating a piece of unique fabric from bits and pieces of fabric, thread, glittery bits and organza and then the participants will use that piece of unique fabric to embellish an art quilt, a purse or a greeting card. It is such a fun "play day" and I thought you might like to see how I translated it into an art quilt.

The centres of the flowers are heavily beaded with additional bead dangles and the dragonfly is adorned with a few tiny seed beads and black sequins for his big eyes ... the wings have been made from Angelina that has been stitched with silver thread.

The grasses blowing in the breeze have been created from organza that has been stitched and then the edges have been left to fray in order to create more wisps.

The stem of the plant has been created by layering two decorative ribbons and yarn and then free motion stitching to give even more texture. The leaves on the plant are made from another piece of unique fabric that I created in green tones.

The background has been stitched in midnight blue thread. The outer edge of the art quilt has been couched with shiny black cord.

This art quilt measures approximately 12" x 20"

Saturday, December 17, 2011

Clergy Stole


This is a custom stole that I made recently for someone who will be ordained to the priesthood soon . . . It was created with the theme of the Shuswap (the lake, mountains, trees) but also with predominately green colours as it will be used during "green" liturgical seasons.

After much hunting for the "right" green background fabric, I was delighted to locate the one I used which has an underlying brown thread in the green ... it works really well with the landscape theme that I was using. The landscape itself has been created from pieces of cotton fabric ... both hand painted and commercial ... and, although the two sides of the front of the stole are similar, they are not identical.


At the back of the neck there is an appliqued cross with an arch on each side, reminiscent of St. Francis' Chapel, the outdoor chapel at Sorrento Centre.

Saturday, September 3, 2011

Delightful Dove Purse

This purse was a custom design which was a delight to make . . . my customer asked for a purse of specific dimensions and design and that it have a dove on it ... and warm colours. Those were great parameters for me and, after more emails we decided that the base fabric for the purse would be navy blue. The purse you see in the photo was created on a base of navy blue linen and the orange and rust hand-dyed cottons are stitched to the linen in softly undulating curves. The dove was created separately, being quilted onto cotton quilt batting, it was then cut out and appliqued to the warm curves. The extra layer of batting behind the dove, gives it just a little additional texture.

The bag is about 10" square as you see it in the photo above, but the flap is also an extension of the purse (it is a large pouch) so there is lots of room for various things that you like to carry with you. The "back" side of the purse has a few drifts of orange fabric as well as the free motion stitching (in both navy and orange threads) which covers the entire bag.

There is hand stitching on the front of the bag and there are additional accessories which go with the bag: a wallet, card case, and eyeglass case.

Here is a photo of the back side of the bag


and the complete set.