Tuesday, October 28, 2014

Sale in my Etsy Shop Oct 27-30

 Some of the many purses and cuffs on sale in my Etsy shop (click on the shop logo on the right side of your screen or visit www.kathykinsella.etsy.com)
Today I want to let you know about the first-ever sale in my Etsy shop.  You can get 10% off anything in my shop until October 30, 2014 by using the coupon code BOBBIN10 at the checkout. This sale is being held along with other members of The Hot Bobbin Team so check out their stores too, for great quilts, Advent Calendars, Christmas stockings, art quilts, table decor and more. Here is the link to the Hot Bobbin Facebook Page https://www.facebook.com/TheHotBobbin

Sunday, July 20, 2014

More indigo . . .

Well, time sure flies . . . I had intended to post a few more photos of the indigo workshop I took earlier this month but with one thing and another, I just didn't do so until today.
These photos are of sample pieces that I dipped in the indigo vat after doing a variety of shibori techniques on the white fabric. We used a variety of fabric ... some cotton, linen, silk as well as some vintage doilies and a silk scarf that I over-dyed. 

The piece that is on the cylinder is a silk scarf that has been wrapped with cord and then pushed to the end of the cylinder before being immersed in the indigo vat several times. The resulting piece has a beautiful chevron look pattern and the wrinkles will stay in the fabric as long as it does not get wet ... must take a photo of that for you to see, too.

I am also working on a piece that was designed by the course leader, Thomas Roach. It is a prayer cloth that has been dyed as a whole cloth and then folded in a specific manner to create a very beautiful cloth that is lined with quilt batting. I am currently working on hand embroidery stitching on it . . . photos to come :0)

Tuesday, July 1, 2014

Dyeing with Indigo

I am taking a workshop this week at Sorrento Centre that focuses on dyeing fabric with natural indigo dye. It is such fun to be a participant in the class and to have fun of playing with fabric for hours each day.

This workshop is led by Thomas Roach who is a talented textile artist from Vancouver and he is preparing vats of dye for us and teaching us all about indigo as well as shibori stitching techniques. I have never worked with indigo before and I love the way it turns from green to blue once it comes out of the vat and hits the air ... who knew!! For two days we have been creating samples on cotton and silk and tomorrow we will start work on a larger piece, a personal prayer cloth, using some of these techniques.

Here is a photo of Thomas and a couple of the participants dipping their samples into the vat . . .
I will try to remember to take some pictures of our samples and post them later ... they are gorgeous!


Wednesday, June 11, 2014

Mini Art Quilt / Mug Rug

This mug rug (in actual fact, just a mini art quilt) was recently commissioned by a neighbour who asked if I could make something for her husband from a treasured shirt that had fallen to pieces.

The grey plaid shirt was particularly special to him but by the time I got it it had been worn and washed so often that parts of it were literally in shreds. There were still a few sections of fabric that were solid, though, and I used them to create this little mug rug. I wanted to retain as much of the essence of the shirt as I could so part of the fabric that I used came from the placket of the shirt and I also used the buttons.

The grey and orange fabric is cotton from Nancy Crow's line and I used it as the back of the mug rug as well.  I added the recipients initial with Shiva Paintstiks and then free motion quilted it in blocks of straight(ish) lines and bound it with black cotton around the edges.

The mug rug measures about 6-8" and was made to fit on the table beside his favourite chair.

Friday, May 2, 2014

A Walk in the Meadows

Today we went for a wonderful walk at Neskonlith Meadows and saw myriad beautiful spring wildflowers in bloom. The meadows are about a fifteen or twenty minute drive from where I live and at this time of the year they burst into bloom. The hills are carpeted in blooms, predominantly yellow balsam root and avalanche lilies (also called glacier lilies) and in some areas it is totally impossible to avoid stepping on them.

I don't even know what all the wildflowers are called but some of them are balsam root, shooting stars, violets, skunk cabbage and avalanche lilies (not all included in this photo collage) ... I will do my homework this weekend and figure out what the rest of them are. 

This walk might be inspiration for many art quilts to come . . .


Wednesday, April 23, 2014

Blessings Prayer Flag

Blessings . . . this prayer flag has many blessings flapping from the lower edge of the flag. It has been created from some of my hand dyed and monoprinted fabrics and was destined to be an example for my upcoming prayer flag workshop but . . .
I  have a friend battling a brain tumour and I felt that this was the week he needed to have this prayer flag so it has already headed off to Vancouver.

This is a very free-spirited flag ... you can see that it is not "square" and there is an asymmetrical and casual balance to the flag, which is how I see life taking us sometimes. The soft purple fabric is a more densely woven cotton than the fabric with the blue and purple monoprint on it, which provides a soft contrast in texture. This is a single thickness of fabric so if it is left outside (or handled a lot) the edges of the fabric will fray and soften with time.

The narrow strips of purple cotton have been printed with many of the blessings I wish for my friend at this time. There is a knot at the end of each blessing and they are attached by a purple bead to the main part of the flag.

One of the techniques we will experiment with in my workshop at Sorrento Centre starting this weekend, is monoprinting ... I'm sure that the participants will feel like they are back in pre-school as we play with paints on gelatin plates and transfer the designs to fabric ... fun! There is still space if you want to join us so just call Sorrento Centre and come along!


Saturday, March 29, 2014

Prayer Flags ... Hope

I am working on prayer flags in preparation for the workshop I will be teaching next month but I seem to be getting hung up on all the people for whom I would like to make a prayer flag. I have several people in my circle who might be uplifted by a handmade prayer flag and they were in my thoughts as I created these two "hope" flags yesterday.


I started off with end pieces of some hand painted cotton and I used the irregular shapes as part of the shape of the flag. The fabric looks very much like a landscape so I used a thermofax screen to add a tree (tree of hope) to which I later added some hand embroidery stitches. At the moment I am making samples using a variety of techniques to add text to the flags, so one of these flags uses stamped letters and the other uses hand-printed letters.

These flags are one layer of cotton (the stitching is visible on the back) and I have left the edges all unfinished and I even started to unravel some of the threads so they would look a bit ragged. If left out in the weather, they will slowly fade and unravel.

I hope to create several more prayer flags or inspiration flags in the next few weeks. If you would like to know more about my upcoming workshop, it is at Sorrento Centre from April 25-30 and there is more information by clicking on the link or by phoning Sorrento Centre at 250-675-2421.


Tuesday, February 11, 2014

A Purse with a Past

I love to have a unique piece of fabric to work with and this purse has been created from a very special piece of linen that was recently given to me . . . let me tell you more . . .

In November I was at the Kamloops Old Courthouse Christmas Fair and one of the visitors to my booth spent some time asking about my work and telling me about vintage linen tea towels that she had inherited from her mother. I believe she said that the tea towels were handwoven in Eastern Europe many years ago, and she wanted them to be used by someone who would appreciate the workmanship.  Before the end of the show, she came back and presented me with several of these beautiful tea towels ... they must have been very lightly used as they were soft from being laundered but showed no wear or stains.

I have been thinking about how I would use these tea towels for some time and have come up with a few ideas but this week I decided to use one to create a purse. I also have some squares of recycled silk kimono fabric that were given to me by another friend and I decided that these brown/green/orange ones would go together in the creation of a purse.


I pieced some of the kimono squares and then appliqued that large "patch" to the linen. I then used more linen for the lining, with quilt batting for a little added structure, and stitched them together. I quilted the kimono blocks and added a few lines of machine quilting to the background as well.

I even added a little pouch to the inside of the purse before adding the cross body strap made of more of the linen ... and a piece of Velcro closure on the flap for added security.

I spent quite some time adding the sashiko hand stitches to the purse.  I used three colours of embroidery floss ... one is variegated warm brownish colours, one is variegated chartreuse colours, and the third is a spring green ... and they are stitched in rows around the kimono block as well as across the purse in a few more areas.

I am very pleased with how this purse turned out and I hope that it will appeal to someone shopping for a unique spring bag.  You can see more views and detail photographs in my Etsy shop.


Tuesday, February 4, 2014

Needle Felted Book Cover

Needle felting is so much fun and it creates rather ethereal looks  . . .  just what I love!

I have been working on a book cover that will protect a Bible. The person for whom the book cover is a gift was very taken with my felted flower gardens and asked if I could create one for her Bible. We talked about some of the things that would make this particularly special for her and this is the beginning of the piece . . .
Needle felting distorts the shape of the base during the felting process, so there is always extra felt that will be trimmed back from the edges before the piece is finished.  I have chosen a couple of pieces of my hand dyed and hand painted fabric (in the top corner of this photo) that I will use for the lining and the binding.

I first needle felted the wool rovings that I chose for the sky and field to the base fabric and then started adding the background flowers before moving to the foreground and creating larger, more detailed flowers. I also felted some hand dyed cheesecloth into the foreground to give some added texture.

After all the felting was done, I used some free-motion machine stitching to create flowing lines in the sky and to accentuate some of the flower shapes as well as grasses and leaves. This helps strengthen the felted piece as well as adding details.

The final step was to add some hand embroidery stitches ... some bright yellow dandelions, delightful red strawberries, and even a couple of butterflies and one little ant :)  I added a piece of lightweight fusible interfacing to the back of the felt in order to stabilize it before constructing the cover. Having the fusible interfacing on the back would help keep the embroidery stitches in place if I happened to snip one when I was squaring up the felted piece.

The cover is finished now and you can see in the detail photo above, the way that I bound the edges before hand stitching the cover right onto the Bible. I wanted the cover to fit very tight and this one was just perfect :)

I added some page markers with pretty glass beads in the shape of leaves. My label is sewn into the inside of the binding so it is not visible when the book is opened.


Sunday, January 19, 2014

New Purses for January 2014

I have had a wonderful week creating a purse each day and posting them in my Etsy shop 
All of these purses are cross-body style and are approximately 7" - 8" square.
 
 I absolutely love this piece of fabric that was given to me by my friend, Angela.  It has an incredibly wonderful design and I love Queen Anne's Lace so much that I couldn't resist free motion stitching an extra one to the back of the purse (sorry, you'll have to check the listing in my Etsy shop to see the additional photos).
 This one was created from a gorgeous piece of hand-dyed fabric and the rusty colour has been carried into the free motion quilting and the funky embroidery stitches that drift from back to front.

The beads that are part of the blanket stitch on the lower edge of the flap are a favourite of mine.


Such beautiful simplicity with neutral shades of beige, grey, taupe and a touch of black and white.


I really do love working with circles, so here is another one. The background of this purse was part of a quilt started by my friend, Denise, but I cut it up and pieced it again and then used the circles for the quilting.


Gorgeous purples in this purse include the new Radiant Orchid, colour of the year for 2014 ... I just like the way it all fits together in an asymmetrical way.  I created some yo-yos for the front flap for an added bit of whimsy.


I could not resist this batik butterfly on a black background. The purse has been densely quilted in an echo design. The lining is a Laurel Burch design of colourful butterflies on a black background, so it is very coordinated :)


This is one of my screen-printed trees on a piece of hand-dyed fabric.  The lining is commercial cotton that has trees on it so ... once again, it is nicely coordinated without being matchy-matchy.


This last purse has just been finished tonight ... you can see that it has the same tree screen-printed on it (the same tree that you saw on my last posting with the prayer/inspiration flags).  This one is printed on a piece of my hand dyed fabric that has swaths of copper metallic paint on it ... there is hand seed stitching as well as some delightful beads on the flap.

Wednesday, January 8, 2014

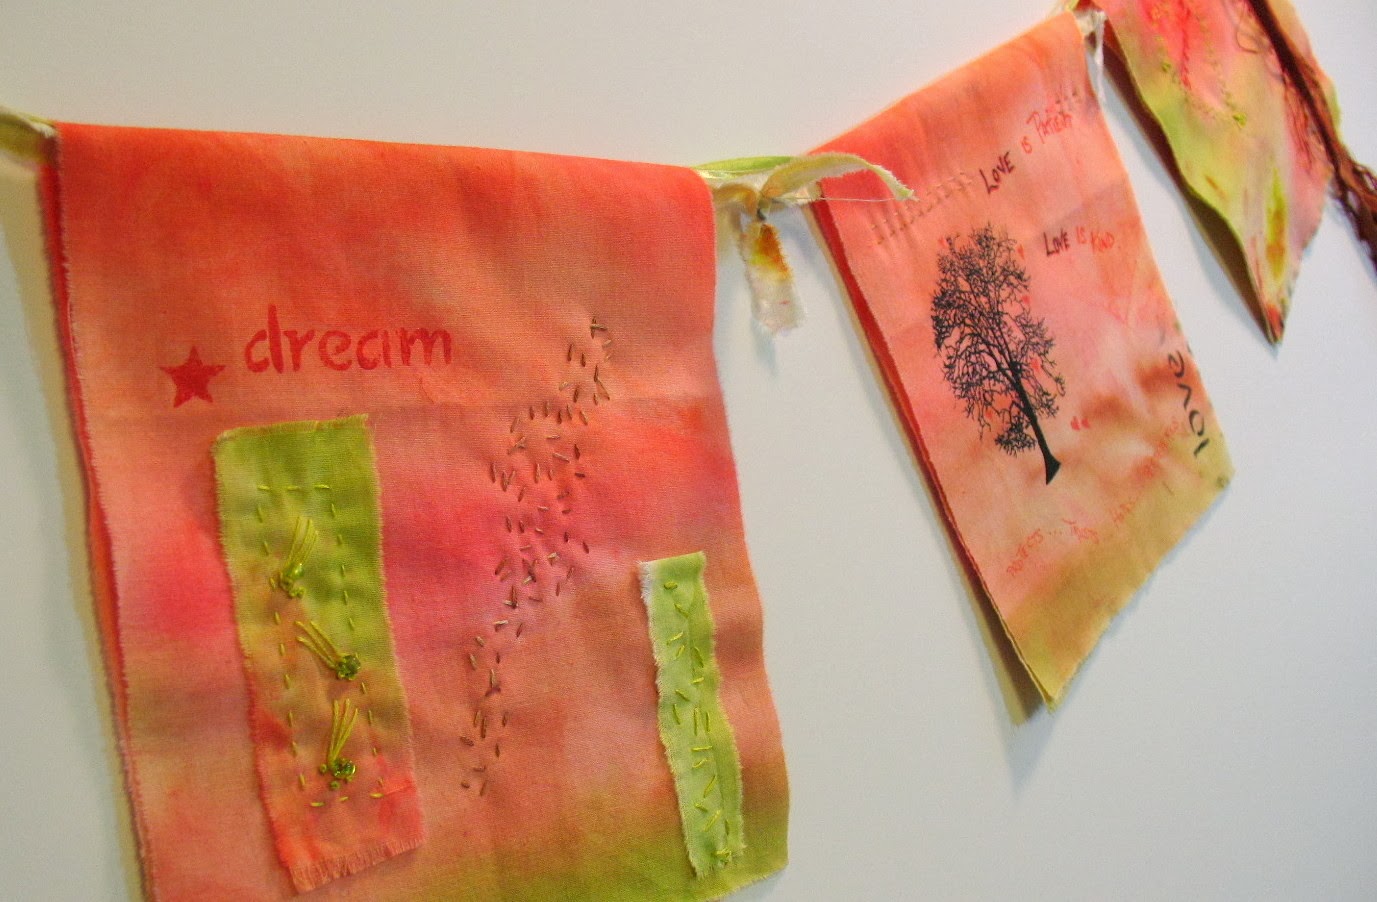
Side two of the Prayer / Inspirational Flags


Because I created these flags with a back side to camouflage some of my stitching, I decided to also add more design elements to the reverse side ... think of them hanging on a clothes line in the garden or from the ceiling in your office, where they can be seen from both sides.

The first flag is "dream" and I have added two little patches of the fabric stitched with primitive hand stitches and a few little beads.  The drift of seed stitches comes through from the front of the flag where it was also a design element.

The centre flag is "love" and some of the words from 1Corinthians are written on this flag. I have also used the screen-printed tree with a few little hearts added as leaves on the tree.
The third flag is "smile" and I stencilled this word into the centre of the stitched heart (which is also part of the design on the other side of the flag). I added a few French knots, a little beaded patch and a ribbon of frayed silk fibre that hangs over the primitive stitching that comes through from the front.
This has been a delightful project to work on and it really has been inspirational, soothing, and thought-provoking as I worked through my choice of text and stitch.

Registration is now open for this workshop at Sorrento Centre (www.sorrento-centre.bc.ca) or phone (250) 675-2421 or toll free 1-866-694-2409.

Thursday, January 2, 2014

Prayer Flags ... Inspiration Flags

I have been having such fun creating a small set of prayer flags as a class sample for my upcoming workshop at Sorrento Centre!  I just know that it will be an enjoyable class for the participants as they work on a theme that suits them using techniques that I will teach during the workshop.

This is a set of three contemporary prayer flags that are double sided, but have no batting between the layers. Some of the stitching has gone through both layers, but each side is unique.  I will show you the second side of this set next week, but for now I'd like to share side one of the three flags. They are approximately seven inches square.

These flags have been created on a piece of my hand-painted fabric that has been awaiting inspiration for a couple of years.  I wish I had taken a photo of the piece of fabric before I tore it up, but you will notice the variations in colour throughout the flags, including little bits of white showing where I had not painted the entire piece of fabric. 

The hues of watermelon and chartreuse have been continued in the threads I chose for the stitching as I really wanted these to be peaceful and harmonious flags.

I chose "hope" for the first flag and the images of hearts.


The next flag will hang as the centre of the three and I chose "peace" for the theme and included a peace symbol that I created in pointillist style.

The tiny buttons (about 1/4" in size)  that cascade down the flag are symbols of something that holds us all together.


The third flag is "believe" and it is represented by a screen-printed tree that is anchored in the earthy part of the flag.

A sprinkling of seed stitches in a variegated thread drift across the flag and in the lower left corner there are three little patches with beads and hand embroidery.


Here is the link to the workshop where I will be teaching inspirational flags and buntings at Sorrento Centre

Monday, December 30, 2013

Welcome Bunting

I have been working on samples for new workshops I will be teaching in 2014 and I am having a really good time with those I am creating for Quilt Week at Sorrento Centre.  My workshop this year is called "Creating Inspirational Flags and Buntings" and it will be five days of playing with surface design techniques with the objective of creating some flags and buntings.

I will be showing you some of the contemporary prayer flags I am creating in a future post, but for now I would like to show you the bunting I made which incorporates a few of the surface design techniques we will be using.


Each of the little flags in the bunting is quilted and the backing fabric is a holly leaves print, so it could be reversed and used as a Christmas bunting, too. Some flags are appliqued, some are painted, there is couching, beading, hand stitching, and painting after quilting, too. Click on the image below to see more details.

If you would like to know more about Sorrento Centre's Quilt Week, there are three concurrent workshops offered, two of which are more traditional quilting courses so your not-quite-ready-for-art-quilting friends can join you for a week of stitching fun. Here is the link to my workshop http://www.sorrento-centre.bc.ca/2014/2014-0425a-kinsella.html

I'll be back in the New Year with some of the inspirational flags that I am creating on my hand-painted fabric.

Wednesday, November 13, 2013

Fibre Art Brooches

This coming weekend (November 16th and 17th) I will be selling my fibre art at Artistry 2013 in Blind Bay.  This is the third year for this wonderful show/sale where local artisans sell their handmade goods.

I like to have something a little different to offer at these local sales and this year I have been creating some fibre art brooches.  They have been fun to make and I will be really interested to see how they are received.

The brooches started off with a felted base of wool roving and then I added some other fibres with additional needle felting or hand stitches. I love exaggerating embroidery stitches and then layering more stitches or beads on top.  The background fabric is ultrasuede and there is a pin back on each piece.

I will also be selling my fibre art purses and cuffs as well as a few of my art quilts.

If you are in the area, drop by the Blind Bay Community Hall on Blind Bay Road (right across from the public beach) on Saturday between 10am and 4pm or on Sunday between 11am and 3pm.

Monday, September 30, 2013

Silk Fusion Wall Hanging - Whispers From the Deep


I started this silk fusion piece in July so that I would have a "work in progress" to work on while I was volunteering at the Festival of the Arts . . . and I immediately realized that it was going to be one of my favourites! It has been on my design wall and I have worked on it occasionally in between other projects and I have thoroughly enjoyed every stitch that has gone into it.  Let me tell you a bit about it . . .


I created the silk fusion using silk hankies and throwsters silk in shades of smokey blue and lavender through magenta.  The piece was formed into a softly curved crescent with lots of feathery edges as well as added texture in the interior of the piece.

After it was dry, the silk fusion was then free motion stitched to a background of royal purple dupioni silk and the background was further enhanced with free motion quilting. I left two areas without the dense machine quilting and later added seed stitches by hand, stitching only into the batting and not all the way through to the backing, so those areas are a bit puffy. I added layered hand embroidery on top of the silk fusion before stitching the gorgeous silk carrier rod in place and then funneling beads into the top and out of the bottom end of the rod.

This is a wall hanging that measures 9.5" x 24.5" (24 x 62 cm) and can be hung by a concealed dowel through the sleeve on the back. The backing is a beautiful batik that has the same colours as the top. It will eventually be for sale through my Etsy shop, but for now I would like to hang onto it and enter it in a couple of shows.


The dyed silk that I used in this silk fusion is some that I purchased through the Etsy seller, Nunoco, in England. The silk carrier rod that is stitched to the surface was the inspiration for the piece.

Thursday, September 12, 2013

Fibre Art Journal #2

Here are the photos of the fibre art journal that I showed you pictures of when it was in progress a few weeks ago.  I have had most of the finishing touches done for some time but, you know, there is always something else that I can add . . . this is a project where you can keep adding finishing touches because it is an item that will be viewed up close for the details that you have created!

This particular fibre art journal showcases techniques that I will teach in an upcoming workshop and I think that the participants will have a great time deciding which of their favourite techniques to include in their journal. If you click on the images, you can zoom in for a closer look.


The accordion journal is double sided so, at this size, there are ten spaces to be filled.
Here is the second side . . .


For this journal I chose to use a black cotton background fabric and my samples are primarily in the green and gold colourway, with little accents of purple.

Some of the techniques include several edge finishes, altered cloth, hand beading, funky hand embroidery, covered sticks and cords, thread painted leaves and organza leaves, fibre art beads, couching threads and cords, hand stamped fabric ... and, of course, I had to include some of the samples on my hand painted and hand dyed fabric.


Sunday, September 1, 2013

Sockeye Salmon Spawning in Scotch Creek

It is the first of September and today we took a drive down the north shore of Shuswap Lake ... had a wonderful walk in the woods at Roderick Haig Brown Park ... a delicious ice cream cone ... and then we stopped at Scotch Creek bridge to see if the salmon were running yet.

This is a one-lane bridge and when traffic approaches from both directions, the west-bound cars get to cross the wooden bridge first. As we crossed the bridge the first time, hubby spotted the red salmon from the moving car. Scotch Creek is a pretty shallow creek so when the sockeye salmon are returning here to spawn it is very easy to see them.  The salmon have bright red bodies and green heads by the time they reach their home river to spawn.

Here are a couple of photos taken of the salmon in the river .. zoom in for a closer look

 I am sure there is an art quilt in here somewhere, just waiting to emerge . . .


Wednesday, August 14, 2013

WIP - Fibre Art Journal Class Sample

I am working on a new class sample for a workshop I will be teaching this fall ... and condensing it from a four-day workshop into two days!  It has been a bit of a challenge to figure out what I will have time to teach in those two days and to give the participants a vision of how their finished journal will look.

The accordion style journal is such fun to make and I hope that these students will enjoy the process as much as the finished product.

So far, I have created all the fibre art samples that I am going to include and now I am working on the finishing touches ... finishing the outer edge and adding some more embellishments to the pages.

Here is one side of it so far ...

and this is the other side, photographed with some of the threads and beads that I am considering ...

I hope to finish this pretty darn quickly and will post some more photos of it later.

By the way, a WIP is a Work in Progress :)

Tuesday, June 18, 2013

Fluttering By

 My butterflies art quilt had its first showing at the Salmon Arm Quilt Show earlier this month and it received lots of oohs and aaahs when visitors took the time for a close look at it.  It measures approximately 20" x 34" and I blogged the process in March if you would like to scroll down to find that post. I am pleased with the way that it has turned out and I'm sure that I will enjoy continuing the butterfly theme into future work.

Here is a detail shot of one of the butterflies. I created the butterflies separately and then machine appliqued them to the quilt before adding hand stitches. The bodies of the butterflies are wet-felted wool. If you click on the photos you can zoom in for a closer look.

This art quilt has been entered in the Shuswap Lake Festival of the Arts show in July.
UPDATE: This piece was awarded "Jurors' Choice Award" at the SLFA July 2013.

Sunday, June 9, 2013

Quilt Show Display

I spent the last two days at the Salmon Arm Quilt Show and I was SO impressed with the quality of this show.  The 300 quilts were beautifully displayed in the arena ... with nice wide aisles so that the quilts could be viewed without congestion. As well as the guild's quilts they had invited vendors and related "fibre" groups such as the needlework guild and the spinners and weavers guild to display at the event. I was invited to be the "featured fibre artist" and I was given a wonderful 8' x 16' space to display my fibre art.

I have never had that much space before so I spent quite a bit of time thinking about how I would set it up and came up with the idea that I would like to have part of it set up as an old parlour ... but displaying my contemporary fibre art. 

Here are a couple of photos of the set up, complete with my antique rocking chair, tea wagon and parson's table. I even included two antique handmade quilts that belonged to my husband's grandmother. I don't do that kind of quilting, but it is where fibre art originated, too, so I was pleased to be able to include them. The gridded frames where I hung some of my purses were originally the frames for screen windows at our hundred year old church before they replaced the windows.